Making mechanical things work better
Last Updated: 21 August, 2001

|
Don't Buy -- Build! Like many minilathe users I found the constant need to mess around with shims when changing toolbits to be a right royal pain in the backside.
The standard toolpost has no built-in height adjustment so when you change
or even regrind a toolbit, you need to check that the cutting edge is on
center and, if it isn't, you've got to shim it until it is.
All this fluffing around can slow you down when you're working on a project that needs several changes of tooling -- and that's why it's a great idea to add a "quick-change" toolpost (QCTP) to the minilathe. There are many different types of QCTPs around, and you can even buy them off the shelf -- although few will fit a small lathe like the 7x10/12 without modification. Of course one of the great things about having a good set of tools is that you get to the point where you don't have to buy much any more -- just about anything you need can be made in your own workshop -- so I decided to make my own QCTP. Rather than use a design with dovetails like many of the commercial designs, I opted for a nice simple unit that Mert Baker from the Yahoo 7x10MiniLathe group suggested.
I chose to include a flange on the bottom of my toolpost so that it had plenty of contact area with the top of the compound -- hopefully this will have increased the rigidity somewhat. Unfortunately, the only size of steel rod I had lying around was 60mm in diameter and I had to turn that down to 50mm at the flange and 28mm for the post. That's a LOT of steel to remove on a small lathe -- but it coped admirably.
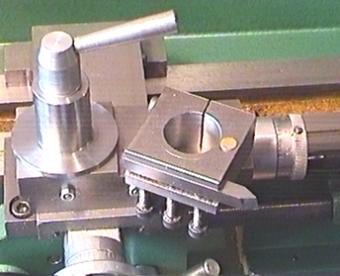
The toolholders slip over this post and are made from a block of aluminum or steel (I used plain 1080 low-carbon steel for mine). Note that the holder is just a 50mm x 50mm x 25mm block which has a slot milled in one side to take the toolbit and a 28mm hole bored through the center. Holes for the three 6mm toolbit retaining bolts were drilled and tapped so that the toolbit can be clamped firmly in the holder and another 6mm bolt is used as a height-adjuster. The side opposite the toolbit is slit right through and a 6mm pinch-bolt is used to pull the two sides together so that the holder can be clamped against the toolpost.
Once the toolholder is clamped to the post, you can use the lever on the toolpost to release clamp the whole assembly to angle the tool as was the case with the original holder. Now the idea is to make several more toolholders and a new toolpost clamp lever that has an arm which can swivel up to a vertical position. This will make changing toolbits simply a case of loosening the single 6mm pinch-bolt, lifting off the existing toolholder/toolbit and dropping a new one on before tightening its pinchbolt. The beight setting for each toolholder will only need to be changed if/when that toolbit is reground significantly. Total time to build: about 4 hours -- most of which was spent turning that big fat steel rod down to make the toolpost.
|
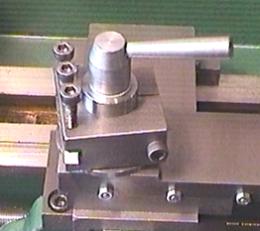
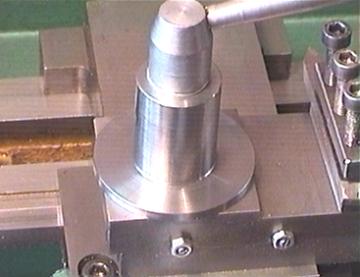 The design I settled on uses a single thick post which provides good rigidity
but is very easy to make using just the lathe itself. I made my toolpost from
some free-machining 1214 steel (I just love the way that stuff cuts and it
gives a brilliantly smooth finish with little effort).
The design I settled on uses a single thick post which provides good rigidity
but is very easy to make using just the lathe itself. I made my toolpost from
some free-machining 1214 steel (I just love the way that stuff cuts and it
gives a brilliantly smooth finish with little effort).
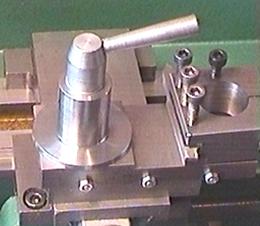 In the picture to the right you can see both the post and the toolholder.
 In this picture the toolholder is upside-down and you can see that I've used
a brass slug in the hole that the height-adjuster bolt runs -- this is so that
it doesn't scratch that nice turned finish on the toolpost :-)
In this picture the toolholder is upside-down and you can see that I've used
a brass slug in the hole that the height-adjuster bolt runs -- this is so that
it doesn't scratch that nice turned finish on the toolpost :-)
|