Forgive me, I know not what I'm doing!
|
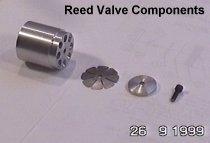 Exploded View
Here are the four components that make up the reed valve assembly. The job of the reed valve is to allow fresh air/fuel to be drawn into the combustion chamber but to slam closed when the mixture is ignited -- thus making sure that all the pressure exits out the back of the engine through the exhaust tube. It's this escaping gas that creates the thrust.
This is made from thin shim-steel, in this case I'm using 0.006" material and that posed a problem -- how to cut it without introducing distortion. Remember, this valve has to seal against the back of the intake venturi so it shouldn't have any of the wavey edges you often get when using snips. I ended up using snips to cut the blank disk to slightly over-size. I then ground it down to the required diameter using the Dremel and a grinding wheel. Creating the petals (there's one for each hole in the venturi block) was done using a thin cut-off disk in the Dremel. This was pretty easy and I found it best to work "freehand" rather than trying to clamp the disk in a vice or against another surface. One hint -- keep don't let the shaft of the Dremel drop below the surface of the disk or it will kick-up. Try to use just the bottom 1/3 of the cut-off disk to do the cutting and it works fine.
Once I'd finished the cutting work I placed the reed between two dead-flat
sharpening stones and ground off the burred edges with a little rubbing. The
result was a dead-flat reed.
Its job is to stop the reed valve from blowing open too far during the intake phase. This reduces the stress on the petals and stops excessive metal fatigue causing premature fracturing (about the only thing that can, and does, fail in these engines). The center of the retaining washer/seat is flat and holds the center of the reed valve hard against the back of the intake venturi.
If you look carefully you'll see that I didn't bother parting this on the lathe..
I just got the hacksaw out -- it was quicker and easier. That means the non-working
face is rough -- but it works.
I don't know what the technical term for "curling" is but it simply involves placing the reed on a medium-hard surface (wood is fine) and running something with a fairly small radius (3/8") over each petal with some pressure. Eventually this causes the metal to curl up away from the surface.
Then all you have to do is bolt the bits together and test it.
To test the assembly I simply stuck the assembly in my mouth -- reed valve towards my tonsils, and blew. I just about deafened myself! I guess it works :-) Pulse jet engines have only one moving part -- and now I've finished that bit.
|
 Making The Reed Valve
 The Retaining Washer/Seat
 Assembing
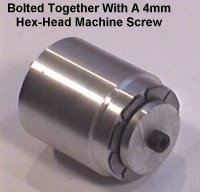 Test It?
|